 Supplies:
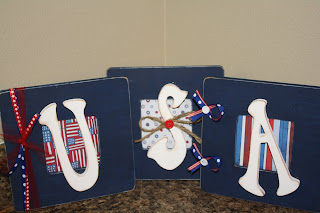
- 3 pieces of 2x2 (or larger i.e. 3x3 or 4x4) wood. Go to Lowe's or Home Depot and find the wood you like. I opted to go a little smaller than what I originally intended. You need 3 pieces at varying heights. I did 6", 8", and 10". I wanted to do them a little taller but I wanted to make more than one set so in order to get the number of sets I wanted from one piece of wood I cut the size of each piece down. Find the guy who cuts wood. He will probably be hiding from you because he already spotted you in the lumber section and is thinking "not her again"! When you find him smile big for him as you are telling him how to cut each piece. All the while you are totally embarrassed because the wood guy now knows you by name!
(I paid $3.33 per set)
- 3 coordinating scrapbook papers (you will only use 1/2 of each piece)
( 1 buck each but you only use half so 50 cents each)
- paint
(you can get a bottle of paint for JoAnn's for 59 cents- you won't even use 1/3 of it for this project)
- sandpaper
(a pack of this at Lowe's or Home Depot will be about $3, but it will last a long time)
- distress ink
(A distress ink pad is about $4.99 so use a coupon or get it when it's on sale like right now at JoAnn's. I have had my pad for a loooooong time.)
- paintbrush
(these are like 25-35 cents each)
- embellishments: tulle, buttons, jute, etc
- wire for the top. I used 20 gauge black jewelry wire.
-mod podge
(Mod podge is about 5 bucks for a small container of it, but it will last you a long time too!)
The How To:
1. Sand your wood pieces.
2. Give them a quick coat of white paint. Most of the wood will be covered in paper.
3. Cut your paper down to size.
4 pieces for each wood block. 12 pieces all together.
4. Now that your blocks are dry sand edges and apply distress ink. I do this with a foam brush.
5. Add distress ink to edges of paper.
6. Mod Podge paper onto blocks. Here is the trick to "mod podge-ing". Put mod podge on wood first. Then on paper. Smooth the paper onto the wood and use the mod podge tools below to prevent bubbles and wrinkles from occuring. Let your mod podge dry for 15-20 minutes. Then add another layer of mod podge to the top of your paper. YOU MUST WAIT THE 20 MINUTES! If you do not wait you will probably have wrinkles or bubbles.

7. Add the wire. Take a push pin to the top of your wood to make a hole for the wire. Cut your wire using an appropriate cutting tool, I used my appigator. Wrap you wire around the handle of your foam paint brush to create a curl in it. Add a tiny amount of hot glue to the end of the wire and stick it into the hole your created using the push pin. Repeat for all 3 firecrackers.

8. Embellish.
- I actually glued my firecrackers together with hot glue before tying them up with the jute. Then, I made the paper flower you see below and here's how I did it: 1. Find 3 different scrapbook papers. 2. Draw a large, medium, and small circle onto the back of the papers (1 circle on each paper scrap). 3. Then tear, yes I said tear, the circle shape out. 4. Add distress ink to the edges. 5. Layer the pieces and hot glue them together. 6. Add a button or brad to the center of the flower! Easy! You can also use stickers or vinyl and add a word like freedom, liberty, USA, etc. going up the side of one of the firecrackers. I might add that to mine! The possibilities for embellishing are endless!
 9. Display and enjoy. My firecrackers are displayed next to my 4th of July subway art which you can download here at my blog.
How Much $ did I Spend?
The wood cost $3.33 per set. The paper I bought was a dollar a piece, but I used about 1/2 or less of each piece so it cost me about $1.50 for the paper. I had the mod podge, paint, brushes, distress ink, sandpaper, jute, button, tulle, and wire on hand from previous projects. I would give a rough guesstimate and say the I used at the most $1.50 worth of these things to complete the project. It is hard to make an inexpensive craft when you don't have a large stash of on-hand materials. But use coupons for things like your mod podge, a bag of assorted buttons, and ribbons. These things will usually last a long time!!! Or get a large group of friends together and split the cost! Also, a great alternative to using paper would be to paint each block. You can paint one blue with white stars, the second white with red stripes, and then the last white with a patriotic word going up the side. This will eliminate the cost of the paper and mod podge.


