
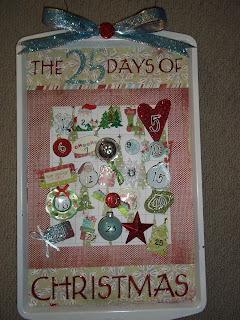
Once I uploaded the picture above I realized I never put the border on the bottom! So I went back and added it on. But this picture was the clearest so I wanted to make sure to keep it on!

I am
FINALLY done with this project, and I am pretty darn excited about it! ha! It was challenging at times to come up with embellishments to use but it is done! I do need to replace the red star because it is to heavy and won't stay on when hanging on the wall! I am just going to go buy a cheap wood star from Joann's paint it and attach that for #24 instead! I wish I would have taken step by step pictures so if any of you wanted to make your own you could! But
here is a blog that kind of helped me. I did do mine a little different but you can get the general idea there. If you google Christmas Cookie Sheet Advent Calendar you find a ton of other blogs that offer tutorials. Also, one of my favorite craft blogs, tatertots and jello, has a tutorial
here. The materials I used were:
- cookie sheet (I got mine at Target for 4 bucks but the dollar tree has a mini one. I feel however that the mini one would be very difficult to fit all 25 pieces on it, so splurge on a more expensive, larger cookie sheet ;). And make sure it is magentic!!!)
-spray paint. I think mine was creamish?
-magnets (I bought the thick, round, black ones because the magnet strips you can buy and cut to size just weren't strong enough)
- 4 pieces of scrapbook paper (3 must be 12x12) one of the peices (the striped one is just for a border so you don't need much. I cut the Christmas tree paper down to 8.5x11 and printed a 5x5 table from word onto the it. The top piece with the snowflakes is just cut in half and glued onto the top and bottom of the cookie sheet. I also rounded the top and bottom corner of the paper with my little "rounder tool thingy". The red dot paper was 12x12 but I cut of the sides to fit into the cookie sheet and maybe a little of the top and the bottom so there was enough room for the title! Then I glued the striped border on to the top and bottom of the red dot paper. You also could use ribbon here instead of paper. Finally, I glued the Christmas tree paper onto the red dot paper. Hopefully this makes sense)
-embellishments galore -- Buttons, ribbons, scrapbook Christmas embellishments, mini cookie cutters, jingle bell, oranment, etc. !!!
-spray glue -- I used elmers's
- cricut for the 25 days of Christmas or pre-made chipboard letters (if you want them glittered spray the elmer's glue on each letter and pour the glitter... Lesson Learned by Yours Truly: DO NOT HOLD THE LETTER IN YOUR HAND WHILE SPRAYING THE GLUE!!! ;)
-glitter (I love Martha Stewart Glitter) I used the colors blue topaz and garnet.
-Apigator or other tool that can punch a hole through metal
- jewelry wire
-ribbon to tie a bow at the top (wired ribbon is best and is 60% off at Michael's right now--Christmas ribbon that is)
-and stickers for the numbers! I also saw people who spelled the number out but I just used the numbers.
I think that is everything!!!!! If you do make one send me a picture. I would love to see it! And if you have any other questions just ask!!! More crafts to come later tonight or in the morning!!! And if you have made some things do share!!!


 It does look much better in person though!!!! I am thinking about taking it all apart and mixing the hot pink and light pink colors together and getting rid of the teal. I thought it would look great! Uh! And just in case you were worried... I fixed the little whole yo you might have noticed on the upper left hand side of the wreath!


