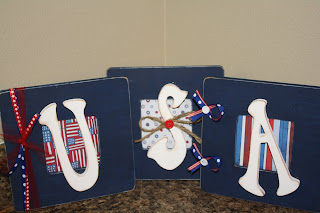
I am little behind in the 4th of July crafts. The past couple of weeks were miserable for me to say the least! But I am feeling better physically and mentally and so I got back into crafting today. Here is a quick supply list and tutorial to make these USA frames.
Supplies:
 -3 frames. My frames have a 3.5 x 3.5 inch opening. They are from Michael's. I got them on sale in December for $1. I don't know how much they are regularly. For all I know they could be a $1 and it wasn't an actual sale! :)
- 3 coordinating Fourth of July scrapbook papers/pieces (or any red, white, and blue paper). You will only need 3.5 x 3.5 inch square of each one. I think it would be fine to use the same paper for each frame too.
- 3 USA wood letters. I bought mine at JoAnns. They were 1.99 each and of course Sam threw away my coupons so I paid full price (ouch), but at least you only need 3 letters.
-Paint. I had the white paint on hand. I bought the blue paint from JoAnns. It is there brand so it was only like 60 cents.
-Glue gun
-Embellishments (not pictured). i.e. Jute, ribbon, tulle, buttons, etc.
The How To:
1. Put your baby/child/children down for a nap, or turn on Mickey Mouse ;).
2. Paint your frames blue. (or red)

3. Paint your letters white.

4. Play with your child while it dries so you don't feel like you are a terrible mother/cut your paper down to 3.5x3.5" squares. Round the edges if needed (this just depends on what frames you are using.)
5. Sand edges of frames and letters.

6. Glue letters onto frames. Hot glue is very unforgiving. It dries instantly so you better get your letters right the first time- unlike me. BUT I just did NOT want to use gorilla glue today. I had not patience for it! So this is my consequence. And just so you know I did want my letters tilted to the side! :)
 7. Ink edges (optional) I used distress ink for mine. I used a foam brush to put on the ink. It is easier to get in the corners that way. You can also use a paper towel or an old rag.
Sorry for the sideways picture-- just tilt your head a little! :)

8. Put paper into frame opening.
9. Embellish.


10. Put on display and sit down and have a diet coke! Or make dinner because it is already 4:30 and you haven't even started it!

P.S. I saw a craft out in blog land that inspired me to make these. I just don't want anyone thinking I am more than a "copy cat crafter"! :) Go here to see it.


7 comments:
So cute Megan! I love them!
Those look great! I love how they turned out. Thanks for the tutorial!! Your family is adorable:) I am a new follower!
www.karismaheartsavannah.blogspot.com
This is a great idea and I love how you backed the frame with paper. Very very cute!!!
following you now. I am loving all of these patriotic crafts in blog-a-sphere!!!
ladeedacreations.com
I wanted to let you know that this will be featured on my blog, 6/30. I am telling you now because I will be on vacation. You have been crowned a Diva for Diva Thursday. Come by and grab a button.
www.ladeedacreations.com
Thank you so much!!!!! I am sooooo excited!
Here is the link to grab your button! You have been crowned a La-Dee-Da Diva!!!
http://ladeedacreations.com/2011/06/diva-thursday-who-will-be-crowned-a-diva-this-week-2/
These are totally adorable! Please link this up with my "4th July treats" Linky!
http://cookinformycaptain.blogspot.com/2011/06/4th-july-strawberries-w-linky.html
Post a Comment