Tuesday, February 22, 2011

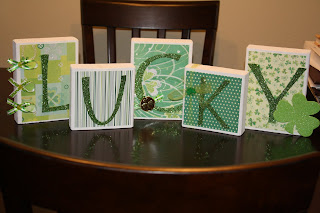
LUCKY Blocks!


Ok... Here is my second project from last week. I have one more to do this week and then I am going to take a short break (unless I find or think of something so cute that I have to do!).
I used extra wood I had from a Church activity and from left over Christmas gifts. The larger pieces are just over 5x7 and the smaller ones are 5x5.

I found this St. Patrick's Day paper at Wooten's scrapbook store. They didn't have a very big selection but I thought these papers were cute enough. I cut the papers down to 6 7/8 x 4 7/8 for the larger blocks and 4 7/8 x 4 7/8 for the smaller ones. I was going to use mod podge but at the last minute decided to use scrap booking photo sticker squares. I used sticky foam circles to attach the letters so they popped out a little.

I cut the letters with my cricut and then used green Martha Stewart glitter I already had on hand to "glitterfy" them. First I covered the letter with mod podge and then quickly added the glitter and let it sit for about 10 minutes before I shook off the excess.

After adding the letters to the wood with the sticky foam circles I added some embellishments and was done! Sadly the U didn't get anything. I couldn't think of what to add to him so he is bare (do you love how I refer to the letter U as him?).

Anyways, these bad boys are going on this "invisible" shelf I am making. But first I need to find the studs in my wall so I know exactly how big I can make this shelf. I am pretty excited though because it is going to serve as my "mantle". I can't wait to decorate it for every holiday!!!!!!

Enjoy!

Welcome Board and Wreath


I made this last week. I really like the burlap wreath. It is only an 8 inch circle but it looks great on this board.

Here is what I did:
First I painted my board. Then I kind of sanded the edges just a little bit and used some white and tan paint to make it look a little more distressed (I guess?) Then, I started to cut out the burlap pieces. I used my 1/2 c. measuring cup to trace a circle on the burlap. I folded the circle in half and then in half again to make a cone like shape (the same way I did the heart wreath for V-day). I stuck a needle through the point on the cone shaped burlap and pinned it into the foam wreath. If you aren't following me here then look here for a better tutorial with pictures!Once I had most of the wreath covered I wrapped a ribbon around it and glue it to the back of the board to keep my wreath hanging. Then I finished covering the remaining wreath foam with the burlap pieces. I bought 1 yard of burlap but used about 1/2 to 3/4 so it would be safe to get 3/4 yard. Then I applied the Welcome vinyl to the bottom of the board. Sadly, it is smaller than I wanted but it will do (for now).

Supplies:
Ok like I said before I used an 8 inch foam wreath which was $3.99 (I bought the green colored one), I bought a pre-cut board from Joanns. It was like 9.5 x 12.5 inches ... something like that... yes I am too lazy right now to go measure it, sorry. It was the biggest one there. It was $9.99 but I used my 40% off coupon. The burlap cost but $3.99 but I didn't use all of it. I used paint, pins, and vinyl I already had.

Enjoy!

Just linked up to:

Friday, February 18, 2011

Bead It Party!

Last night I went to a Bead It Party that Daphne (my sis-in-law) and Pam (her sister) threw! I love the watches I made!!! My mom and I mentioned having a bead it party ourselves and so the ladies are going to send us the dates they have open! I wanted to share some (not so great) pictures of my adorable watches (my favorite is the pink and black one). If you like what you see and want to make your own let me know and I will be sure to send you an invite! Also, you can make bracelets and baby bracelets! They have hundreds and hundreds of adorable beads!!!!! Ok let me know! Thanks Daph and Pam for the invite!!!!!!


Thursday, February 17, 2011

St. Patty's Display

Ok here is my "dusty" display. If you think I didn't notice the dust on my little shelf I did and it has since been wiped down. Don't act like you "forget" to dust the tops of shelves no one can see! haha! Anyways.... It was virtually impossible to get a head on picture of my little shelf because of the light fixture hanging over the table. So I had to take it a little bit from the side! I obviously framed my St. Patrick's Day printable in the white frame. I bought my white frame from Joann's in December for about 4 bucks!!! I have used it for the Christmas and Valentine's printables too! It is definitely getting its use around here! I bought the small lucky work block thingy at Tai Pan for about $2.94 ish. I made the clover block this morning in about 5 minutes. I gave a 5x5 block a quick paint job, mod podged the green dot paper onto it, and added glitter to a foam clover from Michael's!!! I like it! I am going to be making some more blocks for St. Patty's Day but I can't find the paper I am looking for at the moment! I kinda feel like the shelf is missing a little something so I am headed to the dollar tree today! I love that place! Especially the new one off Riverside and Euclid!!!!


I also got this sign at Tai Pan (in Rancho off 4th St. across from Ontario Mills and in between Costco and BJ's Restaurant.) It was less than 10 bucks I think either $6.94 or $7.94!
I also got this at Tai Pan for around the same amount as the one above.
Also at Tai Pan (if you haven't ever been you truly haven't lived yet. But be prepared to be overwhelmed by all things darling and cute!)
Tai Pan (larger version of the small one on my shelf)
This one is from my mother in law. I think it was from Big Lots or a 99 cents store but I am not sure. It seems like it is worth a lot more than 99 cents!
Finally, (for now) I got this vase/jar on sale at Tai Pan for $8.94. I have been wanting one for a long time but I needed a smaller one for my higher kitchen table (it is on my kitchen counter in this picture but will soon be moved to the table). I love the little glitter balls, also from Tai Pan. I saw some glitter shamrocks at the Dollar Tree so I am thinking about going and picking up a pack to add to this.

By the way, all Valentine's decor is 50% at Tai Pan. I picked up 2 large signs for 5 bucks each! :) They are already packed up with my other V-day Decorations. Ok more to come later! Enjoy!
P.S. It is so hard to find places to display my stuff when I have a one year old!!!!!! So I am making a huge self for my living room! Yes I am making it! I might have to ask for a little assistance from some outside support i.e. my husband, father, or Kevin Trask! haha

Wednesday, February 16, 2011

The First St. Patty's Day Post/Printable!

Remember this cute Christmas printable and this cute Valentine's printable from the girls at eighteen25. Well I decided to make my own and I am sharing it with you! It is my first one and of course not as cute!!! But it looks great in my white 8x10 frame. I just printed mine from my home printer on the normal setting (US Letter). If you print it in an 8x10 size from home it will be too small? I don't get it. But anyways, once it was printed I trimmed the sides to fit my frame. I will post pictures tomorrow of the St. Patty's day display! I have a block I need to finish tonight and the wreath for my door (probably not tonight though). Anyways... I will share detailed pictures soon! But for now here is the printable! Remember to first click on the picture. Once it goes into a new window then right click and hit save as. :)

Monday, February 14, 2011

Happy Valentine's Day!

I hope everyone has a great Valentine's Day! One day a girl will be lucky enough to get Valentine's from this little stud but until then he is all mine!!! I am so lucky!


Friday, February 11, 2011

You Rock My World!

I think that this is going to be my last post for Valentine's Day!!! I am so tired and all loved out! Ha! I will be posting the Valentine's I made for Jackson's little friends for our V-day Party on Monday but that's it. They are A-D-O-R-A-B-L-E but I totally copied an idea I found. Thank you for coming along this journey with me!! I hope you and your loved ones have enjoyed it! And stay tuned because as luck would have it (hint hint) I am on to the next holiday!

Now for the last idea (I think):
I first saw this idea here. She includes 3 free downloads in her post so make sure you go check it out. You can do what she did and put the You Rock Valentine card on top of the pop rocks. Or you can tie my tag around the pop rocks or put it in a bag like me! I also made a pink and red tag that matched some rock candy I picked up and tied it around the sticks. You can also give an itunes gift card if you want to do something a little "bigger". Lots of choices here. Ok enjoy the tags. And make sure you go visit The Fickle Pickle. Her free valentine cards would be perfect for your child's classroom!!!


You've Got My Heart on a String!

I originally saw this here. I love the string going through the heart!!! You can go to Sprik Space and download all of her adorable free "just because" printables! I am sure she did not think that someone would see this and think g-string but hey leave it to me. I am just saying! Ok there will be no pictures with this one unless you would like to see pictures of the unmentionables I may or may not have bought. Ha! Enjoy! Or shall I say may the receiver enjoy- crude I know! :)

Don't ever Change/ You Mean More to me Than Gold


Go with which ever phrase you like! I know I have said it before but I got my gold coins at See's Candy. Here are a couple of pictures and the free tags. Remember to print them in a 4x6 format. I am on a role here and I have 2 more coming right behind this one!!!


Sucker for Your Love!

So this idea came to me pretty randomly. I am taking pictures of Jackson for Valentine's Day with a big heart shaped sucker. And then the phrase "I'm a sucker for your love" came to me so of course I had to make a tag. Here you go! Enjoy!


My Heart is Bursting with Love for You!

My heart is bursting for your love and so is my stomach (because all of the starburst are in there). I don't have any pictures for this because I actually ate the starburst the other day while I was working. Yes that's right I ate them. If I get to the store today I will buy some new ones and take pics with the tag. But this is for those of who have already bought them and didn't eat them like me! :) Enjoy!

Thursday, February 10, 2011

SOOOOOO Tired!

I have been gone all day! I have no energy to do any Valentine's posts. In fact, the computer screen is making me dizzy! Sorry for missing a day. I will be back tomorrow. I think I have 5 ideas left. I might not go into detail or have pictures for all of them but I will have the tags! Don't forget you can print my tags in a 4x6 format. No need to recreate your own unless you want to of course! And for those of you who have been asking I use pincik.com to make my tags. More on that later. Ok so what's left: starburst, pop rocks/itunes gift card/ or rock candy (these 3 go together), gold chocolate coins (got mine at see's candy), a sucker(s), and one of those unmentionables just to be romantic if you know what I mean -- that one will go something like this: You've got my heart on a string! get it? anyone? ha Ok see you soon!!!

Wednesday, February 9, 2011

S'more Love

If you haven't made the heart shaped s'mores yet... I just found this right now and had to post. It is a great alternative!

you are one HOT TAMALE!


This one is pretty easy! Buy a box and Hot Tamales and add the tag. Can it get any easier than that? Enjoy!

I'd Love to HANG Out with You!!!!

Here is idea number #11! I paired the tag with a $1 pack of hangers from Walmart. Does anyone else find that they don't ever have enough hangers!!! I swear I never do! I also bought a shirt to go with the hangers. My husband will probably take back the shirt because that is just the way he is! Uh so annoying! :) Ok ... enjoy! Another post coming your way a little later today!